           _____  _____  _____  _____     _____  _____  _____  _____  __ __
 (\___/)  | __  ||  _  ||   __||  |  |   | __  ||  |  ||   | ||   | ||  |  |
 (='.'=)  | __ -||     ||__   ||     |   | __ -||  |  || | | || | | ||_   _|
 (")_(")  |_____||__|__||_____||__|__|   |_____||_____||_|___||_|___|  |_|
 Bash Bunny by Hak5                           USB Attack/Automation Platform
                      -+- QUICK REFERENCE GUIDE v1.2 -+-
     +-----------------+
 +----                 |   The Bash Bunny by Hak5 is a simple and powerful
 | : |    Boot Modes   |   multi-function USB attack and automation platform
 +----               * |   for penetration testers and systems administrators.
     +--|||------------+
        |||
        ||+-- (sw1) Switch Position 1: Customizeable Payload.
        |+-- (sw2) Switch Position 2: Customizeable Payload.
        +-- (sw3) Switch Position 3: Setup Mode - Serial + Mass Storage.
 Welcome & Updating the Bash Bunny Software
 -----------------------------------------------------------------------------
 Congratulations on your new Bash Bunny by Hak5! For the best experience, we
 recommend updating to the latest framework version and payload set from the
 downloads section of https://www.bashbunny.com. There you will find a wealth
 of knowledge and a helpful community of creative penetration testers and
 IT professionals. Welcome!
 Mass-Storage Directory Structure                 Default Settings
 --------------------------------------------     ----------------------------
 .
 |-payloads                                       Username: root
   |-library                                      Password: hak5bunny
   | |-* Payloads from Bash Bunny repository
   |-switch1                                      IP Address: 172.16.64.1
   | |-payload.txt - Bunny Script executed on     DHCP Range: 172.16.64.10-12
   |                 boot in switch position 1
   |-switch2                                      LED Status:
     |-payload.txt - Bunny Script executed on     Blinking Green - Booting up
                     boot in switch position 2    Blinking Blue - Setup Mode
                                                  Blinking Red - Recovery Mode
 Partitions                               Recovery
 ------------------------------------     ------------------------------------
 /dev/root  -  Main Linux file system     If the Bash Bunny Setup Mode fails to
 /dev/nandg -  Recovery file systems      boot >3 times the file system will
               do not modify              recover automatically. DO NOT UNPLUG
 /dev/nandf -  Mass storage partition     while the red LED is blinking.
               Mounted at /root/udisk
 Attack Modes
 -----------------------------------------------------------------------------
 Three of five attack modes may be executed simultaneously.
 SERIAL         ACM     Abstract Control Model        Serial Console
 ECM_ETHERNET   ECM     Ethernet Control Model        Linux/Mac/Android
 RNDIS_ETHERNET RNDIS   Remote Network Dvr Int Spec   Windows (some *nix)
 STORAGE        UMS     USB Mass Storage              Flash Drive
 HID            HID     Human Interface Device        Keystroke Injection
 Bunny Script                                                  Ducky Script
 ----------------------------------------------------------    ---------------
 ATTACKMODE  Specifies the USB devices to emulate.             REM
             Accepts combinations of three: SERIAL,            DELAY
             ECM_ETHERNET, RNDIS_ETHERNET, STORAGE, HID        STRING
                                                               WINDOWS/GUI
 LED         Control the RGB LED. Accepts color and time.      MENU/APP
             R (red), G (green), B (blue), blink time (ms)     SHIFT
                                                               ALT
 LED R 1000  Set LED to blink red at 1 second interval         CONTROL/CTRL
 LED R B 0   Set LED to solid purple (red + blue)              UPARROW/UP
 LED         Turn off LED                                      DOWNARROW/DOWN
                                                               LEFTARROW/LEFT
 QUACK / Q   Injects specified keystrokes                      RIGHTARROW/RIGHT
             Accepts file relative to /payloads/ path          PAUSE/BREAK
             Accepts Ducky Script directly                     DELETE
                                                               END
 QUACK switch1/hw.txt   Inject keystrokes from file            ESCAPE/ESC
 Q STRING Hello World   Inject keystrokes from Ducky Script    HOME
                                                               INSERT
                                                               PAGEUP
 Environment Variables                                         PAGEDOWN
 ----------------------------------------------------------    PRINTSCREEN
 $TARGET_IP         IP Address of the computer received        SPACE
                    by the Bash Bunny DHCP Server.             TAB
 $TARGET_HOSTNAME   Host name of the computer on the           NUMLOCK
                    Bash Bunny network.                        SCROLLOCK
 $HOST_IP           IP Address of the Bash Bunny               CAPSLOCK
                    (Default: 172.16.64.1)                     F1...F12
                                                               SET_LANGUAGE
 Connecting to the Linux Serial Console from Windows           Serial Settings
 ---------------------------------------------------------     ---------------
 Find the COM# from Device Manager > Ports (COM & LPT)         115200/8N1
 Look for USB Serial Device (COM#). Example: COM3
 Or run the following powershell command to list ports:        Baud: 115200
 [System.IO.Ports.SerialPort]::getportnames()                  Data Bits: 8
                                                               Parity Bit: No
 Open Putty (putty.org) and select Serial. Enter COM# for      Stop Bit: 1
 serial line and 115200 for Speed. Clock Open.
 Connecting to the Linux Serial Console from Linux/Mac
 -----------------------------------------------------------------------------
 Find the device from the terminal with: "ls /dev/tty*" or "dmesg | grep tty"
 On Linux the Bash Bunny may be /dev/ttyUSB0 or /dev/ttyACM0
 Connect to the serial device with screen. (apt-get install screen if needed)
 Example: "sudo screen /dev/ttyACM0 115200"
 Disconnect with keyboard combo: CTRL+a followed by CTRL+\
 Example Payload Structure
 -------------------------
 payloads/switch#/
                 |-payload.txt   Primary payload file executed on boot in
                 |               specified switch position
                 |-readme.txt    Optional payload documentation
                 |-config.txt    Optional payload configuration for variables
                 |               sourced by complex payloads
                 |-install.sh    Installation script for complex payloads
                 |               requiring initial setup (may require Internet)
                 |-remove.sh     Uninstall/Cleanup script for complex payloads
 Share Internet Connection with Bash Bunny from Windows
 -----------------------------------------------------------------------------
 - Configure a payload.txt for ATTACKMODE RNDIS_ETHERNET
 - Boot Bash Bunny from RNDIS_ETHERNET configured payload on the host Windows PC
 - Open Control Panel > Network Connections (Start > Run > "ncpa.cpl" > Enter)
 - Identify Bash Bunny interface. Device name: "USB Ethernet/RNDIS Gadget"
 - Right-click Internet interface (e.g. Wi-Fi) and click Properties.
 - From the Sharing tab, check "Allow other network users to connect through
   this computer's Internet connection",  select the Bash Bunny from the
   Home networking connection list (e.g. Ethernet 2) and click OK.
 - Right-click Bash Bunny interface (e.g. Ethenet 2) and click Properties.
 - Select TCP/IPv4 and click Properties.
 - Set the IP address to 172.16.64.64. Leave Subnet mask as 255.255.255.0 and
   click OK on both properties windows. Internet Connection Sharing is complete
 Share Internet Connection with Bash Bunny from Linux
 -----------------------------------------------------------------------------
 - Download the Internet Connection Sharing script from bashbunny.com/bb.sh
   e.g: wget bashbunny.com/bb.sh
 - Run the bb.sh connection script with bash as root
   e.g: sudo bash ./bb.sh
 - Follow the [M]anual or [G]uided setup to configure iptables and routing
 - Save settings for future sessions and [C]onnect
 (\___/)      Find further documentation, repository of payloads,      (\___/)
 (='.'=)      tutorial videos and community support forums at          (='.'=)
 (")_(")      bashbunny.com.                         (C) Hak5 LLC      (")_(")
In 'Arming' Mode Switch position 3 Serial connection is the default method.
First determine your COM Port by opening device manager.
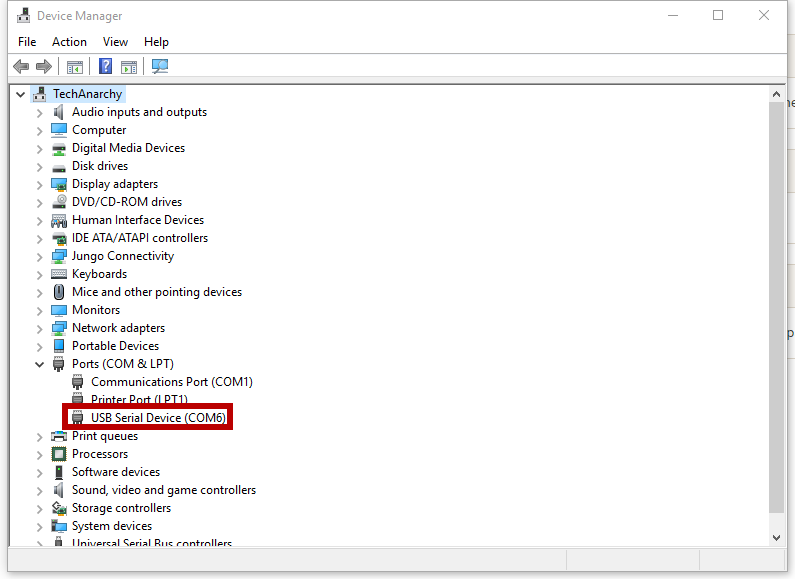
Fill in connection details to match the image below.
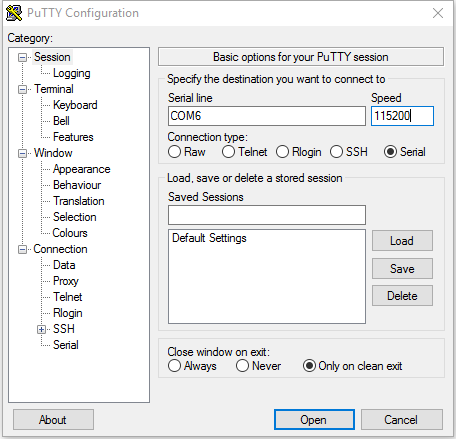
When you connect you should see a logon prompt. You may need to hit the enter key a couple of times.
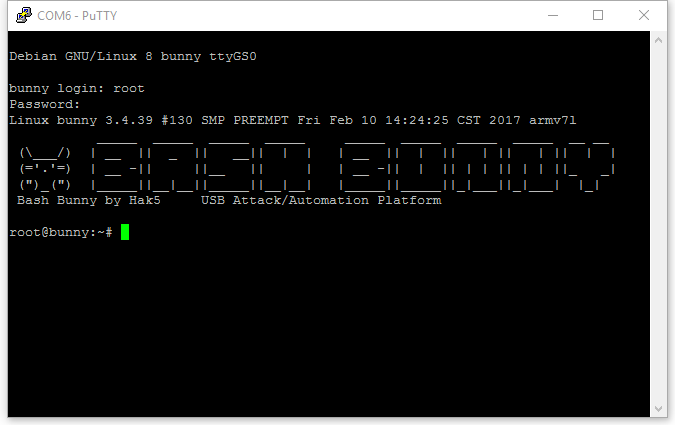
The default username is root and the default password is hak5bunny
In order to SSH on to the BashBunny you need to set an attackmode for one of the ethernet types
An example payload follows.
#!/bin/bash
LED R B
ATTACKMODE ECM_ETHERNET
Once the Bash Bunny is plugged in it should assign your computer an ip address in the 172.16.64.x range. Typically your machine is assigned .10 and the BashBunny is assigned .1
From here its just a matter of using your fav SSH command line or client to connect. ssh root@172.16.64.1
Default Credentials are the same as serial interface. Username: root Password: hak5bunny
Following the same method as SSH Connection. You can use a client like WinSCP or nativly on nix sftp connections to 172.16.64.1
From Linux desktops you can use filebrowser to connect to a server and use sftp://root@172.16.64.1 as the server address for a folder view of the Bash Bunny
If you dont have SFTP clients available you can create custom payloads to copy files on to the device.
#!/bin/bash
#
# This payload will copy files from the USB Storage to the device
# Just set the switch position to match
#
switchposition="1"
singlefile="/root/udisk/switch${switchposition}/nameofyourfileshere.ext"
folderoffiles="/root/udisk/switch${switchposition}/name_of_folder/"
targetdir="/root/tools/"
LED G
ATTACKMODE ECM_ETHERNET STORAGE
# Flash Purple to indicate progress
LED R B 1000
# Copy single file to target folder
cp ${localfile} ${targetdir}
# Copy Dir to target folder
cp -r ${folderoffiles} ${targetdir}
# LED To green for complete
LED G
Copy this text to a payload.txt file and put it alongside the files you want in to a switch position on the Bunny. Remeber to set switchposition and file / folder paths to match
First grab your ducky script, create one using the payload generator or the origional ducktoolkti website
Then copy it on to the USB storage area under the switch number you want
Create a payload based on the example below make sure you update switch1 to match the switch folder and the filename
#!/bin/bash
LED R B
ATTACKMODE HID
QUACK switch1/duck_code.txt